Python RabbitMQ demo
Contents
参考资料
RabbitMQ “Hello World!” Python
https://www.rabbitmq.com/tutorials/tutorial-one-python.html
pika documentation
https://pika.readthedocs.io/en/0.10.0/intro.html
简要说明
原始需求大概如下:
有一个 Python 项目 和 Java 项目希望进行对接。
希望由 Java 调度 Python 进行 新建一个 扫描任务, Python 调用 Nessus 扫描,完成扫描后将结果回传给 Java 。
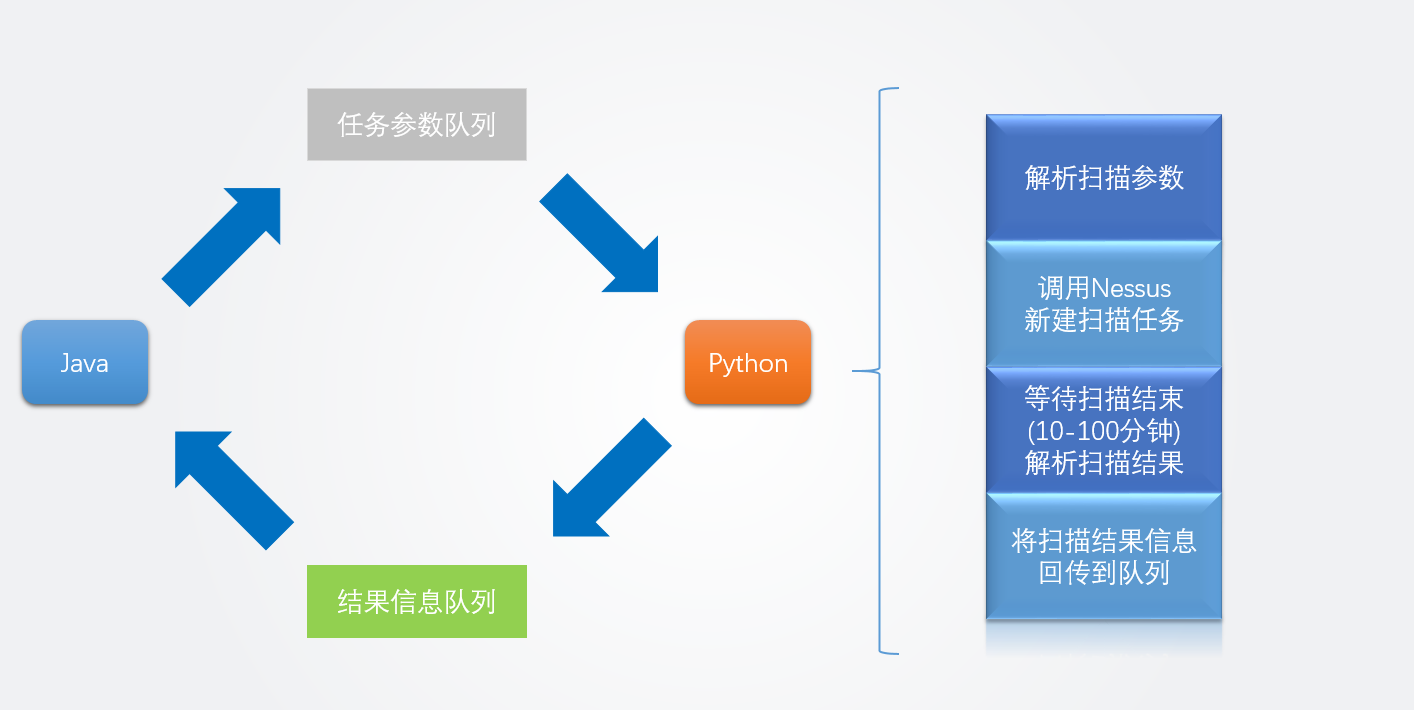
(还是有一些问题, Python 部分在同步处理扫描任务,有必要修改成异步模式)
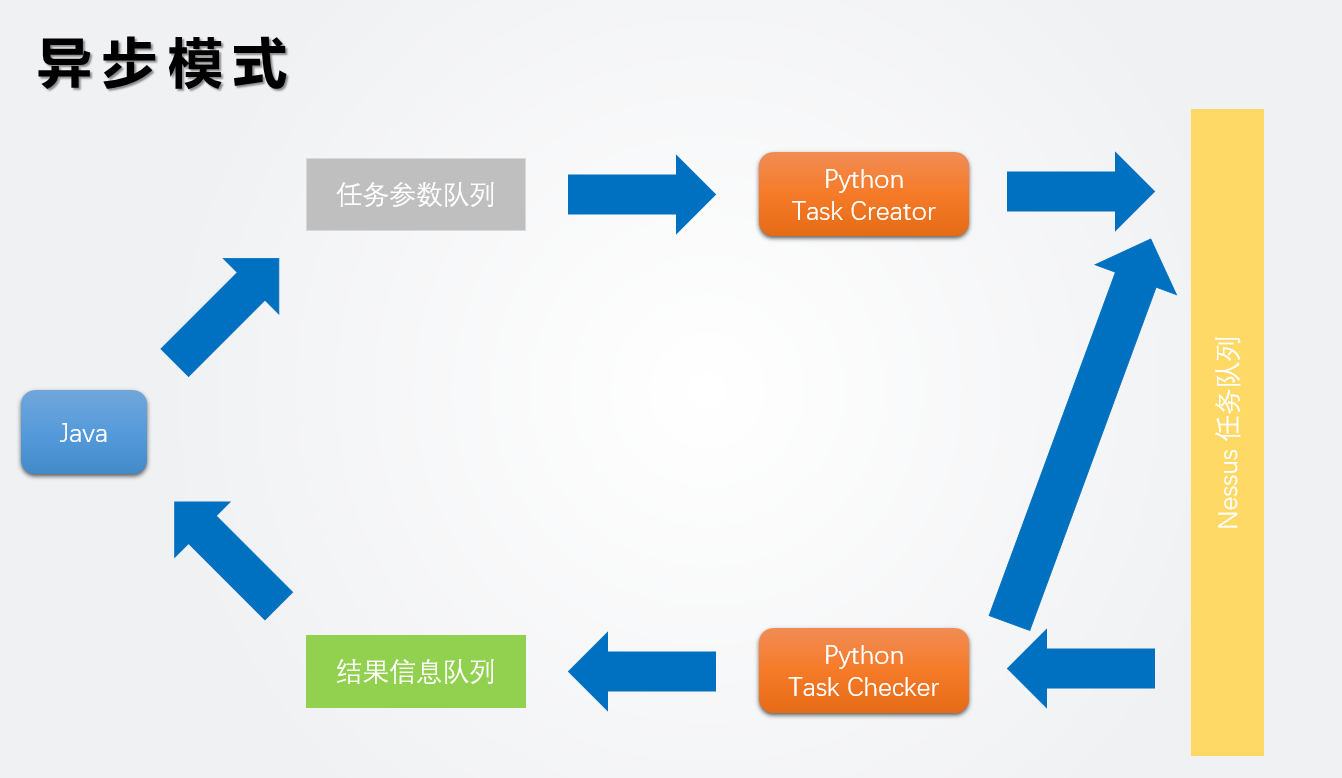
异步模式的一个思路
Task Creator 只负责新建任务
Task Checker 不断遍历 Nessus 任务队列的元素,如果任务状态为完成,就回传给 Java, 如果任务状态为未完成,就重新添加到 Nessus 任务队列的末尾。
这里仅展示部分 RabbitMQ 相关的框架性代码。
rabbitmq_config.py
#!/usr/bin/env python
# -*- coding: utf-8 -*-
# @Time    : 2018/9/2 18:21
# @Author  : BLKStone
# @Site    : http://wp.blkstone.me
# @File    : rabbitmq_config.py
# @Software: PyCharm

import pika

# 说明
# 1 运行 demo_rabbitmq_consumer.py
# python demo_rabbitmq_consumer.py
# 2 运行 demo_java_receiver_simulator.py
# python demo_java_receiver_simulator.py
# 3 运行 demo_rabbitmq_producer.py
# python demo_rabbitmq_producer.py

# RabbitMQ 客户端
# 对 pika 的部分参数进行进一步封装
class RabbitMQClient(object):
    def __init__(self):
        # amqp://username:password@host:port/<virtual_host>[?query-string]
        self.rabbitmq_schema = 'amqp://admin:admin@localhost/vhost'
        self.task_queue_name = 'q_vhost_task'
        self.result_queue_name = 'q_vhost_result'

        # Consumer 配置项
        self.durable = True
        self.no_ack = True

        # Producer 配置项
        self.exchange = ''
        self.routing_key = ''

    # 获取 channel 和 connection 对象
    def get_channel_and_connection(self):
        parameters = pika.connection.URLParameters(self.rabbitmq_schema)
        connection = pika.BlockingConnection(parameters)
        channel = connection.channel()
        return channel, connection
demo_rabbitmq_consumer.py
#!/usr/bin/env python
# -*- coding: utf-8 -*-
# @Time    : 2018/9/2 14:49
# @Author  : BLKStone
# @Site    : http://wp.blkstone.me
# @File    : demo_rabbitmq_consumer.py
# @Software: PyCharm

import json
import requests

from rabbitmq_config import RabbitMQClient


# 下载远程文件(FastDFS)到本地
# https://www.zhihu.com/question/41132103
def download_from_FastDFS(url):
    r = requests.get(url)
    file_name = url.split('/')[-1]

    print("FastDFS URI: {uri}".format(uri=url))
    print("Local FileName: {path}".format(path=file_name))

    with open(file_name, "wb") as f:
        f.write(r.content)
    f.close()


# 将 json 字符串输出
def print_json_string(json_string):
    json_object = json.loads(json_string)
    for k in json_object:
        if type(json_object[k]) == type(u""):
            val = json_object[k].encode('gbk').strip()
        else:
            val = str(json_object[k])
        print("{key} : {value}".format(key=k, value=val))


# 发送消息给另一 (Java 监听的) 队列
def send_to_java(message_payload):
    rabbit_client = RabbitMQClient()
    channel, connection = rabbit_client.get_channel_and_connection()
    channel.basic_publish(exchange=rabbit_client.exchange, routing_key=rabbit_client.result_queue_name,
                          body=message_payload)
    print(" [x] [Python] Sent {info}".format(info=message_payload))
    connection.close()


# basic_consume 回调函数
def callback(ch, method, properties, body):
    print(" [x] [Python] Received %r" % body)
    # print_json_string(body)
    message = '{"task_id": 100001,' \
              '"task_name": "scan-201808",' \
              '"start_time": "1535883121",' \
              '"end_time": "1535883165"}'
    send_to_java(message)


def main_consume():
    rabbit_client = RabbitMQClient()
    channel, connection = rabbit_client.get_channel_and_connection()
    channel.queue_declare(queue=rabbit_client.task_queue_name,durable=rabbit_client.durable)
    channel.basic_consume(callback, queue=rabbit_client.task_queue_name,no_ack=rabbit_client.no_ack)

    print(' [*] [Python] Waiting for messages. To exit press CTRL+C')
    channel.start_consuming()


if __name__ == '__main__':
    main_consume()
demo_java_receiver_simulator.py
#!/usr/bin/env python
# -*- coding: utf-8 -*-
# @Time    : 2018/9/2 15:12
# @Author  : BLKStone
# @Site    : http://wp.blkstone.me
# @File    : demo_java_receiver_simulator.py
# @Software: PyCharm

from rabbitmq_config import RabbitMQClient


def java_callback(ch, method, properties, body):
    print(" [x] [Java] Received %r" % body)

# 模拟 Java 监听 结果(result)队列
def java_consume():
    rabbit_client = RabbitMQClient()
    channel, connection = rabbit_client.get_channel_and_connection()
    channel.queue_declare(queue=rabbit_client.result_queue_name,durable=rabbit_client.durable)
    channel.basic_consume(java_callback, queue=rabbit_client.result_queue_name,no_ack=rabbit_client.no_ack)

    print(' [*] [Java] Waiting for messages. To exit press CTRL+C')
    channel.start_consuming()


if __name__ == '__main__':
    java_consume()
demo_rabbitmq_producer.py
#!/usr/bin/env python
# -*- coding: utf-8 -*-
# @Time    : 2018/9/2 16:42
# @Author  : BLKStone
# @Site    : http://wp.blkstone.me
# @File    : demo_rabbitmq_producer.py
# @Software: PyCharm

from rabbitmq_config import RabbitMQClient


def sender():
    rabbit_client = RabbitMQClient()
    channel, connection = rabbit_client.get_channel_and_connection()
    json_string = '{"task_id": 100001,"task_name": "scan-201808","target": "127.0.0.1/24, 127.0.0.2/24"}'

    # channel.queue_declare(queue=rabbit_client.task_queue_name)
    channel.basic_publish(exchange=rabbit_client.exchange,
                          routing_key=rabbit_client.task_queue_name, body=json_string)
    print(" [x] Sent {info}".format(info=json_string))
    connection.close()

if __name__ == '__main__':
    sender()
其他补充
关于 no_ack
当 no_ack=True 时, 消费者收到消息后无需确认。
当 no_ack=False 时, 消费者收到消息后需要手动确认(ack),消息才会从队列中消失。
Leave a Reply